Files with the .tar extension, often called tarballs, are used for storing many files inside a single archive. Usually, but not always, tar files are compressed to save space. For example, gzip compression on a tar archive will change the file’s extension to .tar.gz, or just .tgz.
The tar format has been around since the early ’70s and is a preferred archive format on Linux systems. Files inside a tar archive will have their permissions, ownership, and other file data preserved – a feature that many other archive formats, such as ZIP, don’t offer.
The tar command is used to create tar archives and extract their contents. There are many options when it comes to creating tar files, particularly because there are many types of compression available on Linux. Opening tar files is a simple process, and it only takes a moment to learn how.
In this guide, we’ll go over all the tar commands you’ll need to know in order to create tar archives and extract files from tar archives.
Commands to Create tar Files
The main thing you need to know before creating a tar archive is what type of compression you wish to use. There are pros and cons to each, and our guide on what is the best compression tool in Linux may help you decide which to use. If in doubt, just default to gzip compression, as it’s widespread, quick, and efficient.
The two options you will always need are c (create) and f (file) to specify the name of the archive. Apart from that, simply list the files and directories that you wish to put into the tar archive.
Example 1. Create a tar archive with no compression – .tar file extension.
$ tar cf archive.tar file1 file2 file3
Example 2. Add the z option to create a tar archive with gzip compression – tar.gz or .tgz file extension.
$ tar czf archive.tar.gz file1 file2 file3
Example 3. Add the j option to create a tar archive with bzip2 compression – tar.bz2 file extension.
$ tar cjf archive.tar.bz2 file1 file2 file3
Example 4. Add the J option to create a tar archive with xz compression – tar.xz file extension.
$ tar cJf archive.tar.xz file1 file2 file3
Example 5. The v (verbose) option is helpful to see what files tar is currently adding to the archive.
$ tar czvf archive.tar.gz file1 file2 file3
file1
file2
file3
Example 6. You can also use zstandard compression – .tar.zst file extension.
$ tar acf archive.tar.zst file1 file2 file3
Commands to Open tar Files
Opening .tar files on the Linux command line is simple. The only two options you need are x (extract) and f (file) to specify the location of the archive.
Example 1. Extract files from a .tar archive.
$ tar xf archive.tar
Example 2. The same syntax is used to extract files from compressed tar archives.
$ tar xf archive.tar.gz
$ tar xf archive.tar.bz2
$ tar xf archive.tar.xz
etc...
Example 3. Use the -v (verbose) option to see which files the command is extracting.
$ tar xvf archive.tar.gz
file1
file2
file3
Example 4. Use the -C (Change to directory before performing operation) option to extract files to a specific location.
$ tar xf archive.tar.gz -C /path/to/dir
Example 5. To see all the files inside a tarball, use the t option instead of x.
$ tar tf archive.tar.gz
file1
file2
file3
Example 6. To extract specific files from a tarball, list their paths and names after the name of the archive.
$ tar xf archive.tar.gz file1 file2 file3
or
$ tar xf archive.tar.gz file*
GUI Tool for Creating and Opening tar Files
In general, all Linux distributions and desktop environments come with a default GUI tool that can manage tar archives. The process for creating and opening tar files will be slightly different between various systems.
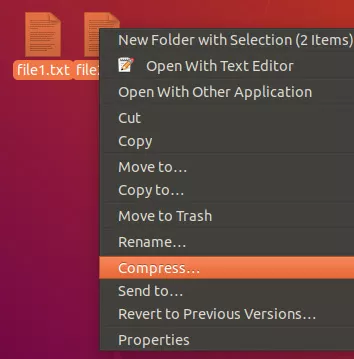
Usually, you can highlight multiple files and then right click one to create a tar archive. Here’s an example from the GNOME desktop environment on Ubuntu. In this case, the option is listed as “compress.”

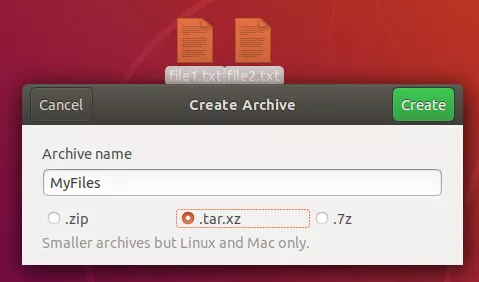
On the next prompt, you can choose to create a tar archive. In this case, a .tar.xz file.

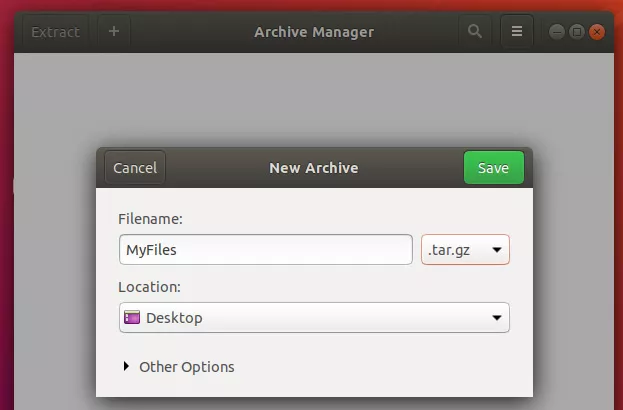
You’ll see more options available in the Archive Manager application itself (shown below), including gzip compression.

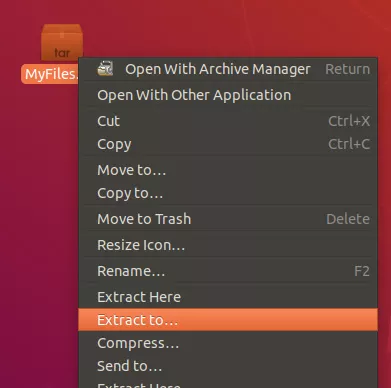
To open a tar file and extract its contents, you can open it with your system’s archive manager, or simply right click on it and find the “extract” option.


