The recoverjpeg tool available on Linux can scan hard drives, SD cards, or any storage device for lost photos. It’s a great tool for recovering deleted photos or attempting to salvage some pictures from a corrupted storage device. We’ll explain how it works and show you how to use it in this guide.
There are at least a few decent file recovery tools available, so why choose recoverjpeg? Personally, I like it for its simplicity. It’s very straight-forward and easy to use. If you’re trying to recover photos from an SD card or USB drive, it’s definitely a top contender for the ideal recovery tool.
Recently, I used it to recover more than 3,000 photos from a 4TB hard drive. I still lost a lot of photos too, but I’m quite pleased with the results I got. No recovery tool is perfect. If you write new data to the disk after deleting files, there’s a good chance that your deleted files have now been overwritten completely and are irrecoverable.
What Does recoverjpeg Do?
- As the name implies, recoverjpeg works strictly on JPEG files. It comes with another tool named recovermov that – you guessed it – works to recover MOV files.
- Images compressed with the JPEG standard have a certain file structure they adhere to. recoverjpeg is able to search for this pattern and use it to identify JPEG files on a file system. When it finds one, it recovers it.
- recoverjpeg can restore photos from a variety of file systems, including NTFS, FAT32, and ext4, among others.
- recoverjpeg also works on filesystem images, like the kind you can create on Linux with the
ddcommand.
How to Use recoverjpeg
For this example, we will use recoverjpeg to recover a handful of deleted photos from a USB drive. The steps should be applicable to any device or storage image.
1. First, we need to install recoverjpeg on our system. On Debian-based systems like Ubuntu, you can install the tool directly from the system’s package manager.
$ sudo apt install recoverjpeg
If you’re on a different Linux distro, then you can download and install recoverjpeg from the official git repo.
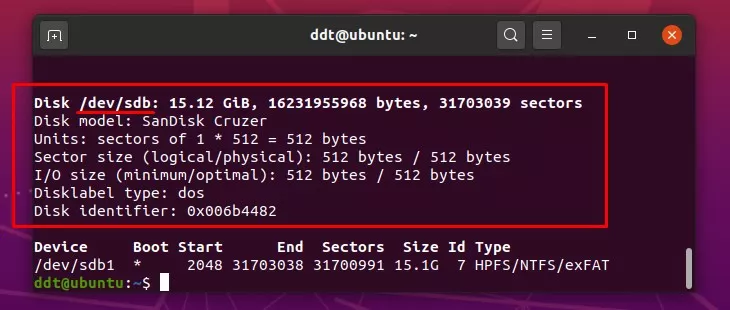
2. Make sure the device you wish to recover from is currently inserted into your computer. Identify the device name with the fdisk command.
$ sudo fdisk -l
In our case, the USB drive we wish to recover from is /dev/sdb.
3. recoverjpeg will be putting the recovered photos into whichever directory you run the command from. Let’s make a new directory specifically for the recovered photos.
$ mkdir ~/Recovered && cd ~/Recovered
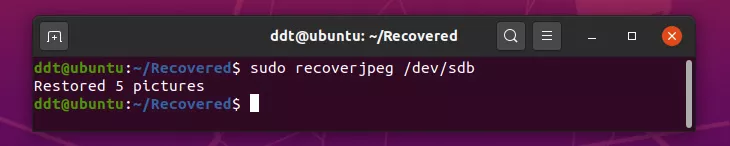
4. Run the recoverjpeg command and specify your device name.
$ sudo recoverjpeg /dev/sdb
5. recoverjpeg will begin to scan the entire filesystem and give you a running total of how many pictures it has recovered throughout the process. The process can take quite a while to finish, depending on the device, its size, and your system’s hardware.
6. When recoverjpeg finishes up, it will let you know how many photos it was able to restore.
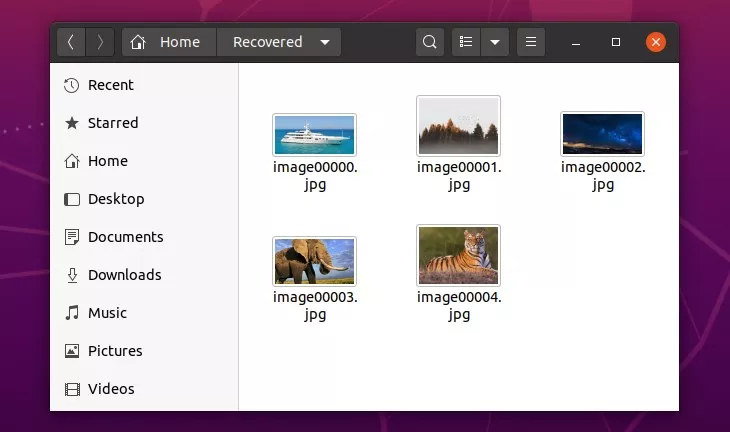
7. Open the “Recovered” directory we created earlier to see all your recovered pictures.
That’s all there is to it. recoverjpeg is very simple to use and doesn’t have a lot of options. To see all its documentation, run the man command.
$ man recoverjpeg
It’s not uncommon to end up with a lot of repeat photos after the recovery process. If your Recovered directory contains some duplicate photos, you can use the remove-duplicates command to get rid of the extras. This command is part of the recoverjpeg package.
$ cd ~/Recovered
$ remove-duplicates
Be sure to also check out recovermov, which comes with the recoverjpeg package and performs the same function, except it recovers MOV files.
$ man recovermov
