As a backend developer, sometimes you have to work with other people who have no knowledge of how to prepare the environment to work with for a certain project, which requires downloading a repository, preparing the environment, working with databases, and other requirements.
The problem is how can you make them collaborate with certain parts of your code and avoid doing everything to make the project run locally on their machines? For that, there’s an extension for Visual Studio Code, which allows you to share your current project (previously opened) with other people, and it also includes chat so you can communicate real time with them.
Related tutorial: How to Install Visual Studio Code on Ubuntu
This tutorial will show you how to install the Live Share Extension and how to start collaborating or sharing your projects with others.
Requirements:
- Latest version of Visual Studio Code software
- You must be logged in with your GitHub account
Install Live Share Extension from the Extension Marketplace
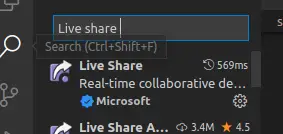
First, you must open Visual Studio and go to the Extensions Settings. If you don’t know how to get there, you can just press the following combination: Ctrl + Shift + X. Once you are in, just type in “Live share”, you will see many live share extensions just select the one with “Live Share” as you can see in the following image:
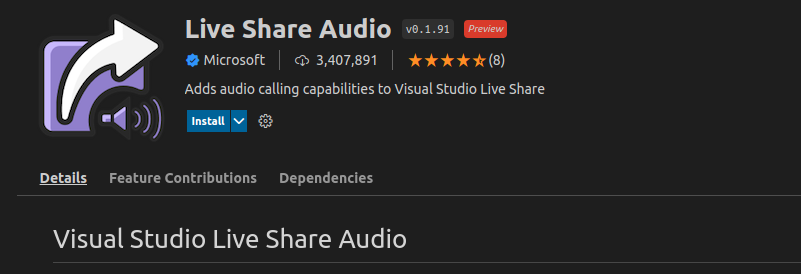
Then you will see the extension description with all the features, just click on “install.”
Another method to install this extension is just using the combination: Ctrl + P and type:
ext install MS-vsliveshare.vsliveshare-pack

Once the Extension is installed, you will see an icon like this on the side bar:
![]()
This means that you are ready to share or access any invitation to collaborate on any project.
Note: If you don’t see the icon after you install the extension, you can close your Visual Studio session and reopen it. This will refresh your configuration.
Start Collaborating
To start using Live Share,, you just have to click on the extension. You will see two options: “Share” is to create a session for other people to join, and “Join” where you can insert a URL previously created from the host. Also we can see a list of contacts, this is all users we previously collaborated with.

To start using sharing our session, just click “Share” and wait for the process to finish.

This will create a link for you to share with anyone in order to collaborate with your project. You can make it read-only if you want, if you don’t want your guests to modify anything.
The people who have your link only need to select the “Join” button and paste your link in the field.

Then you will receive a notification of someone trying to access your session, you can accept for read-only, write, or reject. In this case we accept the request.

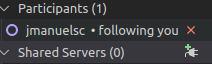
Once you accept, you will see that your guest is in the list of participants of your current session.
You can see what your participant is currently modifying. Each user has their own pointer with a unique color and the user’s name:

If we want to expel someone from our session, just move the cursor over the user and click on the cross icon.
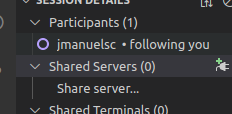
We can also keep inviting more participants, once we create our live session, you can see a list of options:
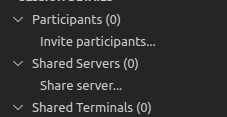
We can also share servers, if we are running our projects in a certain port, we just click on “Share server…”, then just type our port, in this case we have our project running on port 8000, then press enter.

Then we can also provide a name for the shared server to keep things organized if we have a lot of servers.

Now we can see that our server is shared with all the members.
![]()
If we want to stop the collaboration, just click on the icon aligned with the SESSION DETAILS title.
![]()
Troubleshooting
If you already used this extension and after a while we can’t use it or can’t find it anywhere, you have to make sure that Visual Code Studio is updated, some extensions require features from latest versions.
Make sure that you and the people you are going to work with have their GitHub accounts in their sessions, this is probably already covered if you all work with this IDE.
People who are collaborating with you can’t see your not staged files, this means that if your repository has files that store keys or some vulnerable information, they will not see them. So if you need them to work with those files, you may have to find some techniques to make them visible.
